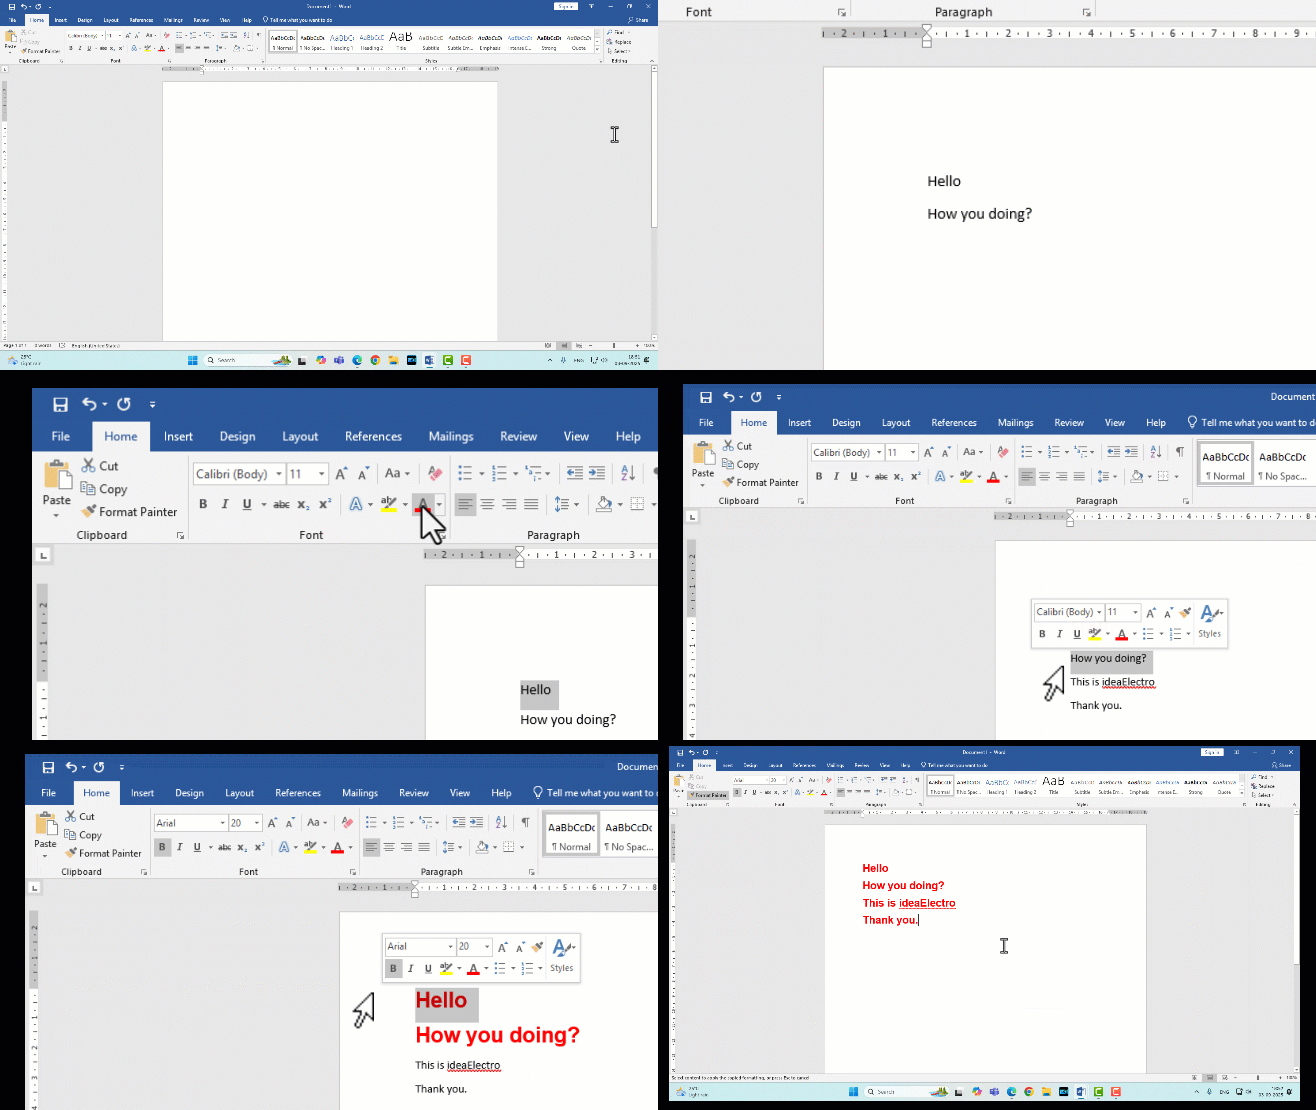
Format Painter is a feature in Microsoft Word that copies formatting attributes—such as font type, size, color, bolding, italics, alignment, or paragraph spacing—from one piece of text or object and applies them to another. Located in the Home tab under the Clipboard group, it is represented by a paintbrush icon, making it easy to spot.
The primary benefit of Format Painter is its ability to streamline formatting tasks. Instead of adjusting multiple settings individually, you can replicate a desired look with a single click, ensuring uniformity across your document. This is particularly useful for maintaining professional standards in documents with multiple headings, lists, or styled paragraphs.
Where does Format Painter Located.
[Video: Zooming Format Painter]
In Microsoft Word, navigate to the Home tab on the ribbon, which is typically the default tab when you open a document. Look for the paintbrush icon in the Clipboard group, usually positioned near the Copy and Paste buttons.
Keyboard Shortcut: While there’s no direct keyboard shortcut for Format Painter, you can access it quickly by using Alt + H, F, P (press Alt, then H, then F, and finally P) to activate it without a mouse.
Using Format Painter for Single Formatting
Format Painter is ideal for applying formatting to a single section of text or a paragraph. Here’s how to use it:
- Highlight the text or paragraph that has the formatting you want to copy. For example, if you have a heading formatted in Arial, 16-point, bold, and blue, select that heading.
- Click the Format Painter icon in the Home tab. Your cursor will change to a paintbrush, indicating that the tool is active.
- Click or drag over the text or paragraph where you want to apply the formatting. The selected text will instantly adopt the formatting of the source text.
Using Format Painter for Multiple Formatting
To apply the same formatting to multiple sections of your document, use Format Painter’s multiple-use mode:
- Select the Source Text: Highlight the text with the desired formatting.
- Double-Click Format Painter: Double-click the Format Painter icon. This locks the tool, allowing you to apply the formatting to multiple areas without reactivating it.
- Apply to Multiple Targets: Click or drag over each section of text or paragraph where you want the formatting applied. You can continue applying the formatting to as many sections as needed.
- Deactivate Format Painter: To stop, either click the Format Painter icon again or press the ESC key on your keyboard.
Tips and Tricks
To get the most out of Format Painter, consider these advanced techniques:
- Copying Formatting Between Different Elements: Format Painter works not only with text but also with tables, shapes, and text boxes. For example, you can copy the border style of one table and apply it to another.
- Using with Styles: If you’re using Word’s Styles feature, Format Painter can copy style-based formatting (e.g., Heading 1, Normal) to other text, though it’s often better to apply styles directly for consistency.
- Limitations: Format Painter cannot copy certain complex formatting, such as section breaks or page layout settings. It also doesn’t copy content—only formatting.
- Combining with Other Tools: Use Format Painter alongside the Styles pane or Themes to create a cohesive document. For example, apply a theme for overall consistency, then use Format Painter for specific tweaks.
Practice using Format Painter in your next Word document to get comfortable with its functionality. For more advanced Word tips, explore Microsoft’s official documentation or online tutorials to expand your skills. With Format Painter in your toolkit, you’ll be able to create polished documents in no time!


